Thursday, September 30, 2010

Count-down timer

On this page, I will introduce the Count-down timer with PIC16F84A. I am putting a count-down timer by the hardware on Electronic Circuits Application Garage. The function of the timer is the same as it approximately. (The stop switch is added) Because this unit was made compactly, the wiring of the back becomes quite complicated.
This is PIC16F84A. In case of PIC16F84A, it is possible to use a clock frequency upto 20 MHz. The circuit this time, I am using 10-MHz resonator.

This is the IC which decodes the binary code of 3 bits. 8 conditions can be expressed by 3 bits. 74HC138 outputs only one an L level out of 8 by the 3-bit input condition.

Download Source code
Download Hex File 
  
This flasher moves, while lighting of LED drags on. The brightness of LED is four kinds, bright, less bright, almost dim and dim. These lighting states are moved with time. Control of brightness is performed in lighting time of LED like PWM(Pulse Width Modulation). There is no PWM function in PIC16F84A. Therefore, I divided lighting of LED into four cycles, and controlled them. It is "Bright" when all periodic lightings are carried out. 2 cycle lighting state is "Less bright". 1 cycle lighting state is "almost dim". It is "Dim" in OFF a total cycle. At first, I was going to prepare much more cycles. However, because PIC16F84A carried only 1K-word program memory, I made into four cycles.
   The timer function of PIC is used for the processing which moves the lighting position of LED. When man looks at the lighting situation of LED, it is not meaningful if too quick. In this circuit, it is the purpose to show so that lighting of LED may drag on. In order to lengthen time of a timer, 4MHz resonator is used. The period with 4MHz frequency is 1/4,000,000 = 0.25 microseconds. Because 4 periods (the clock) are necessary to the count of the timer, a count is downed with the timer every microsecond. Because a prescaler of 1/256 is used for the input of timer, actually, a count is downed with every 256 microseconds. When making the initial value of the timer as 195, the time-out becomes 256µsec/count x 195count = 49920µsec = 50msec.
 

Wednesday, September 29, 2010

Reading from the I/O ports

The program will only move onto ‘Carry on here’ only if bit 0 on PortA is set to a 1. Let us now write a program which will flash an LED at one speed, but if a switch is closed it will flash the LED twice as slow.  You can probably work this program out for yourself, but I have included the listing anyway.  You could try and write the whole program, just to see if you have grasped the concepts.  We are using the same circuit as before, with the addition of a switch connected RA0 of the PIC and the positive rail of our supply.
;*****Set up the Constants**** 
STATUS          equ       03h                  
TRISA              equ       85h              
PORTA            equ       05h               
COUNT1         equ       08h               
COUNT2         equ       09h                  
;****Set up the port****
bsf                    STATUS,5      
movlw              01h                   
bcf                   STATUS,5        
;****Turn the LED on**** 
Start                 movlw              02h              
movwf              PORTA                                 
;****Check if the switch is closed

BTFSC            PORTA,0            
                                                      
call                   Delay                   
;****Add a delay 
call                   Delay 
;****Delay finished, now turn the LED off****
movlw              00h                 
movwf              PORTA     
;****Check if the switch is still closed

BTFSC             PORTA,0   
call                    Delay               
;****Add another delay**** 
call                    Delay 
;****Now go back to the start of the program
goto Start               
;****Here is our Subroutine
Delay
Loop1
decfsz               COUNT1,1    
goto                  Loop1            
decfsz               COUNT2,1    
goto                  Loop1      
return
;****End of the program****
end   
                                                               
What I have done here is to turn the LED on.  I then check to see if the switch is closed.  If it is closed, then I make a call to our delay subroutine.  This gives us the same delay as before, but we are now calling it twice.  The same goes for when the LED is off.  If the switch is not closed, then we have our old on and off times.

delay loops into our program

Let us put these delay loops into our program, and finish off by making it a real program by adding comments:
;*****Set up the Constants**** 
STATUS         equ       03h
TRISA             equ       85h
PORTA           equ       05h
COUNT1        equ       08h
COUNT2        equ       09h
;****Set up the port****  
bsf                   STATUS,5
movlw              00h
movwf              TRISA
bcf                   STATUS,5
;****Turn the LED on**** 
Start               movlw        02h
movwf               PORTA                                                 
;****Start of the delay loop 1**** 
Loop1          decfsz      COUNT1,1
goto              Loop1 
decfsz           COUNT2,1
goto              Loop1   
;****Delay finished, now turn the LED off**** 
 movlw              00h 
movwf              PORTA 
;****Add another delay**** 
Loop2
decfsz             COUNT1,1
goto                 Loop2    
decfsz             COUNT2,1
goto                 Loop2
;****Now go back to the start of the program
goto                 Start
;****End of the program**** 
end                              ;Needed by some compilersand also just in case we miss the goto instruction.
 
 You can compile this program and then program the PIC.  Of course, you will want to try the circuit out to see if it really does work.  Here is a circuit diagram for you to build once you have programmed your PIC.

Delay Loops

There is one slight drawback to our flashing LED program.  Each instruction takes one clock cycle to complete.  If we are using a 4MHz crystal, then each instruction will take 1/4MHz, or 1uS to complete.  As we are using only 5 instructions, the LED will turn on then off in 5uS.  This is far too fast for us to see, and it will appear that the LED is permanently on.  What we need to do is cause a delay between turning the LED on and turning the LED off.
The principle of the delay is that we count down from a previously set number, and when it reaches zero, we stop counting.  The zero value indicates the end of the delay, and we continue on our way through the program.

first we define our constant:  
COUNT          equ       08hNext we need to decrease this COUNT by 1 until it reaches zero.  It just so happens that there is a single instruction that will do this for us, with the aid of a ‘goto’ and a label.  The instruction we will use is:
DECFSZ        COUNT,1
 This instruction says ‘Decrement the register (in this case COUNT) by the number that follows the comma.  If we reach zero, jump two places forward.’  A lot of words, for a single instruction. Let us see it in action first, before we put it into our program.
COUNT          equ 08h
LABEL           decfsz   COUNT,1
                        goto LABEL
                        Carry on here.
 What we have done is first set up our constant COUNT to 255.  The next line puts a label, called LABEL next to our decfsz instruction.  The decfsz COUNT,1 decreases the value of COUNT by 1, and stores the result back into COUNT.  It also checks to see if COUNT has a value of zero.  If it doesn’t, it then causes the program to move to the next line.  Here we have a ‘goto’ statement which sends us back to our decfsz instruction.  If the value of COUNT does equal zero, then the decfsz instruction causes our program to jump two places forward, and goes to where I have said ‘Carry on here’.  So, as you can see, we have caused the program to stay in one place for a predetermined time before carrying on.  This is called a delay loop.  If we need a larger delay, we can follow one loop by another.  The more loops, the longer the delay.  We are going to need at least two, if we want to see the LED flash..

Writing To the Ports

In the last tutorial, we I showed you how to set up the IO port pins on the PIC to be either input or output. In this tutorial, I am going to show you how to send data to the ports. In the next tutorial, we will finish off by flashing an LED on and off which will include a full program listing and a simple circuit diagram so that you can see the PIC doing exactly what we expect it to. Don’t try and compile and program your PIC with the listings here, as they are examples only.

                  First, let us set up Port A bit 2 as an output:
                  bsf 03h,5 ;Go to Bank 1
                  movlw 00h ;Put 00000 into W
                  movwf 85h ;Move 00000 onto TRISA – all pins set to output
                  bcf 03h,5 ;Come back to Bank 0

This should be familiar from the last tutorial. The only difference is that I have set all of the pins on Port A as output, by sending 0h to the tri-state register.
We define a label very simply. We type a name, say START, then type the code:

                  Start movlw 02h ;Write 02h to the W register. In binary this is
                                            ;00010, which puts a ‘1’ on pin 2 while keeping
                                            ;the other pins to ‘0’
                  movwf 05h ;Now move the contents of W (02h) onto the
                                    ;PortA, whose address is 05h
                  movlw 00h ;Write 00h to the W register. This puts a ‘0’ on
                                    ;all pins.
                  movwf 05h ;Now move the contents of W (0h) onto the Port
                                    ;A, whose address is 05h
                  goto Start ;Goto where we say Start
As you can see, we first said the word ‘Start’ right at the beginning of the program.  Then, right at the very end of the program we simply said ‘goto Start’.  The ‘goto’ instruction does exactly what it says.

The most common registers

STATUS
To change from Bank 0 to Bank 1 we tell the STAUS register. We do this by setting bit 5 of the STATUS register to 1. To switch back to Bank 0, we set bit 5 of the STATUS register to 0. The STATUS register is located at address 03h (the ‘h’ means the number is in Hexadecimal).

TRISA and TRISB
These are located at addresses 85h and 86h respectively. To program a pin to be an output or an input, we simply send a 0 or a 1 to the relevant bit in the register. Now, this can either be done in binary, or hex. I personally use both, as the binary does help visualize the port. If you are not conversant with converting from binary to hex and vice versa, then use a scientific calculator.

PORTA and PORTB
To send one of our output pins high, we simply send a ‘1’ to the corresponding bit in our PORTA or PORTB register. The same format follows as for the TRISA and TRISB registers. To read if a pin is high or low on our port pins, we can perform a check to see if the particular corresponding bit is set to high (1) or set to low (0)
 
W
The W register is a general register in which you can put any value that you wish. Once you have assigned a value to W, you can add it to another value, or move it. If you assign another value to W, its contents are overwritten.

Tuesday, September 28, 2010

PIC 16F84A PIN diagram


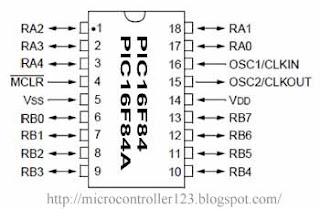
The given diagram showing the pin-outs of the PIC 16F84. I will go through each pin, explaining what each is used for. Microchip manufacture a series of microcontrollers called PIC. There are many different flavours available, some basic low memory types, going right up through to ones that have Analogue - To- Digital converters and even PWM built in. I am going to concentrate on the 16F84 PIC. Once you have learnt how to program one type of PIC, learning the rest is easy.
RA0 To RA4 : RA is a bidirectional port. That is, it can be configured as an input or an output. The number following RA is the bit number (0 to 4). So, we have one 5-bit directional port where each bit can be configured as Input or Output.
RB0 To RB7 : RB is a second bidirectional port. It behaves in exactly the same way as RA, except there are 8 - bits involved.
VSS And VDD : These are the power supply pins. VDD is the positive supply, and VSS is the negative supply, or 0V. The maximum supply voltage that you can use is 6V, and the minimum is 2V
OSC1/CLK IN And OSC2/CLKOUT : These pins is where we connect an external clock, so that the microcontroller has some kind of timing.
MCLR : This pin is used to erase the memory locations inside the PIC (i.e. when we want to re-program it). In normal use it is connected to the positive supply rail.
INT : This is an input pin which can be monitored. If the pin goes high, we can cause the program to restart, stop or any other single function we desire. We won't be using this one much.
T0CK1 : This is another clock input, which operates an internal timer. It operates in isolation to the main clock. Again, we won't be using this one much either.

Multi PIC Programmer

"Multi PIC Programmer 5 Ver.2" is a PIC programmer, which can program to 8-pin to 40-pin devices using single ZIF socket. I built "Multi PIC programmer 5 Ver.1", in order to enable it to program 40-pin devices like PIC16F877 with a ZIF socket. Lately I improved this PIC programmer. The main improvements are having made it suit "VPP before VDD" and changed wiring of a ZIF socket for accepting devices with LVP (Low Voltage Programming) mode.
Before you build this "PIC programmer", I recommend checking to see if there is enough output voltage at the serial port your personal computer. If TxD, DTR, and RTS do not have more than +7.5V(or -7.5V), this programmer will not work well, especially, with the latest laptop computers that using low power RS232 interface ICs.
Other important matters are as:
1. The GND line of a serial port forms relative VDD on a PIC programmer. All the GND symbols in a circuit diagram are a PIC programmer's GND. Never connect them with GND line of a serial port.
2. This PIC programmer changes VPP in accordance with the device selected (8-18pin) or (28-40pin) with one sliding switch. So, if the insertion position of a device and slide switch is not set correctly, your PIC may be damaged by over voltage.
3. This PIC programmer does not support all PIC MCUs. (PIC16C5x is not programmable with this programmer. By using an adapter, the 20 pin PIC 16C770/771 can be programmed.
4. I did not try all PICs since and I do not have all them. The PICs, which I successfully programmed and verified, are PIC12F629, PIC12F675, PIC16F627, PIC16F628, PIC16F630, PIC16F676, PIC16F818, PIC16F819, PIC16F84A, PIC16F873, PIC16F877A, PIC18F2320, PIC18F452.
5. The programming software used is IC-Prog of Bonny Gijzen.
6. "Hardware settings" of IC-Prog are the same as the JDM programmer.

Monday, September 27, 2010

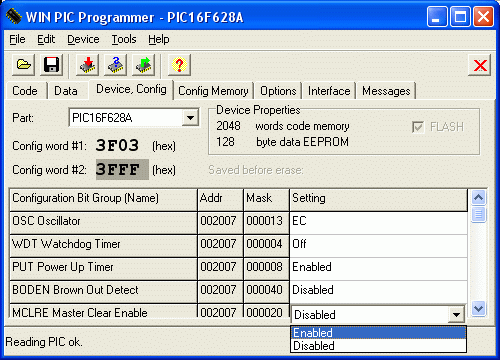
PIC Programming through WinPic

WinPic now supports a large variety of PICs with different programming algorithms. Programmable devices are listed on the Features page.
Note that most programming adapters supported by WinPic do not meet Microchip's requirements for a "production grade" programmer. If you think you need a production grade programmer (which can verify the PIC at different voltages), look below.
WinPic lets you ...
  • program a HEX-file into a PIC microcontroller
  • read the contents of a PIC and save it as a HEX file
  • read and modify the configuration word(s) of the PIC
Keep in mind that this program is still far from being "professional" software ! Last not least because this program is freeware, the entire risk of its use is with you - read the disclaimer if you haven't yet. 

How generate a Hex file and Burn it into PIC??

Now that you know how to write code, you need to know how to get your code into the PIC. The process of programming a PIC is often referred to as “burning”. To burn code into the PIC, we will be using the windows version of MPLAB.

In the MPLAB program, all the information about your program is stored in a project files. Project files contain information about the program, the device you’re using, one or more assembly language codes and compiled hex files. The process of burning a PIC contains three major steps. The first is to write the code in assembly language. Once the code is written, it must be compiled into a hex file for programming into the device. After successfully compiling the code, the final step is to program the device.

Begin by opening up the program MPLAB.

Create a new project by going to Project>New Project. In the new project dialogue box select a directory to place the project in and give the new project a name. When you’ve finished, click “Ok”.

You will now see the Edit Project dialogue box. Select the appropriate device, and set the development mode to MPLAB-SIM Simulator. In the project files window click the file that has the name of your file with a .hex extension. Click on the Node Properties button and in the window that appears, click “Ok”. This sets default node properties and allows you to add nodes later.

Exit the Edit Properties box by clicking “Ok”.

Now you may create assembly code. Got to File>New. A blank text editor box should appear. Enter your assembly code into this window. When you are done, save the code (File>Save, give the code a name and click “Ok”).

You must now assign the source code you just made to the project. Go to Project>Edit Project. In the Edit Project dialogue box, click the Add Node button. Browse to find the assembly code you just found. Select it and click “Ok”. The file name for the assembly code should now appear in the window. Click “Ok” to close the Edit Project box.

Now that the source code is associated with the project, its time to compile the code. Go to Project>Make Project. If the compile is successful, you will see the Build Results window appear with the message “Build completed successfully”. If there were errors they will be listed in the window. After compiling successfully, save the project (Project>Save Project).

The final step is to program the device. Select Picstart Plus>Enable Programmer. The Programmer Status dialogue box should appear. At this point, you should have the Picstart Plus device programmer plugged in and th serial cable connected to the serial port on your computer. Place the PIC in the ZIF socket with pin 1 in the top left corner, and lock it in place.

Sunday, September 26, 2010

How to build a PIC porgrammer in home??

The given circuit is very simple serial PIC16F84 programmer that does not require an external power supply since it extracts power form the RS232 connection of PC. It can be make home easily by eaching or in vero-board. This programmer is only useful for PIC16F84 and PIC16F84A micrecontroller. The production cost will maximum 1$ or 50Rs/-. So it can be build easily in home.


How to program a PIC microcontroller in home??

There is many types of microcontrollers are available in market such as AVR, PIC, ARM etc. AVR and PIC are brand names of products from Atmel & Microchip respectively - see their websites for details. For first time, you should use PIC programming (PIC16F84 or PIC16F84A).
Before starting programming study the datasheet carefully. The datasheet is given below :
http://hotfile.com/dl/71824197/3673eaf/35007b.pdf.html
To download PIC compiler click on http://hotfile.com/dl/71822254/06fd298/MPLAB_IDE_v8_56.zip.html
and
http://hotfile.com/dl/71822661/823e460/MPLAB_IDE_8_56_Release_Notes.zip.html
This are very useful full version compiler. At first of my PIC programming I use this compiler in my PC. Start with PIC assembly language, then others.

What is Microcontroller??


A microcontroller is a small computer on a single integrated circuit containing a processor core, memory, and programmable input/output peripherals. Program memory in the form of NOR flash or OTP ROM is also often included on chip, as well as a typically small amount of RAM. Microcontrollers are designed for embedded applications, in contrast to the microprocessors used in personal computers or other general purpose applications.

Microcontrollers are used in automatically controlled products and devices, such as automobile engine control systems, implantable medical devices, remote controls, office machines, appliances, power tools, and toys. By reducing the size and cost compared to a design that uses a separate microprocessor, memory, and input/output devices, microcontrollers make it economical to digitally control even more devices and processes. Mixed signal microcontrollers are common, integrating analog components needed to control non-digital electronic systems.